Oobleck, usually a mixture of cornstarch and water, is a non-Newtonian fluid. That means it has properties of both liquid and solid. If you apply pressure on it, it becomes hard like a solid and offers you resistance. But, if you stop applying pressure, it acts like a liquid and flows smoothly. Making oobleck for a science project is very interesting albeit easy. Kids can also play around with the gooey material. Given here are the steps of how you can make it with cornstarch and other ingredients.

Things You Will Need
- Cornstarch, sometimes referred to as corn flour
- Bowl
- Water
- Food Coloring (Optional)
Instructions For Making Oobleck With Cornstarch or Corn Flour:
- Take a cup or 8 oz of cornstarch in a large bowl. You can mix it with your hand for a while to get comfortable with the texture.

- You can add 1-2 drops of food color to half a cup of water. Stir the mixture. Then pour it over the cornstarch. It will add more fun than playing with plain white putty.

- Add another half a cup of water into the cornstarch. While adding, you should stir the water gradually, mixing it with your hands. Don’t try to do the procedure all at once since that could hinder the proper mixing of the cornstarch with water.
- Modify the concoction as per your requirement. If you want a thin texture, add more water. If you want the goo to be thick, add a little more cornstarch.

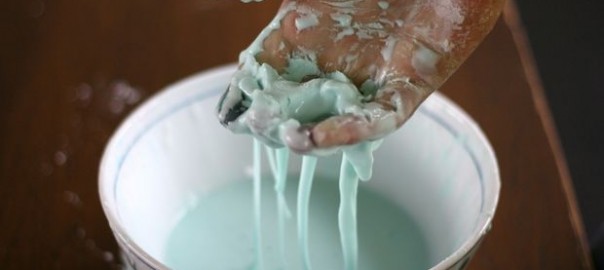
- It’s playtime! Take some part out with your hands and have fun by hitting it, allowing it to drip from your hands, kneading it, molding it into a variety of shapes including rolling it up like a ball.

- Once you are comfortable with the material, start experimenting. Check what happens when you let it settle down for a minute before picking it up again or when you press it too hard.
Here are a few more experiments to try:
- After making a ball with the substance stop applying pressure suddenly and see what happens.
- Spread a thick layer of oobleck over a pie plate and slap the surface. Check if the layer stays put in the place or drips down the sides.
- Fill up a large bucket with oobleck and try jumping up and down on it. What do you observe and feel?
Alternative Procedure: Oobleck In A Ziplock Bag
The ingredients of the mixture can be put inside a ziplock baggy in the same order as described above. Zip it, then squish the contents to mix thoroughly. After mixing is complete, open the bag and take out your oobleck.
How Do You Make Oobleck Without Cornstarch
Oobleck with Borax
- Take half cup water in a disposable plastic container.
- Add food coloring to the liquid. You can use green color to make your creation similar to the goopy solution of Dr. Seuss’ book “Bartholomew and the Oobleck”. Incidentally, the fluid owes its name to this book.
- Add half cup school glue to the water. Stir until they combine completely.
- Take another container and mix half cup of water and the same quantity of liquid Borax in it. Since Borax is used for laundry, it can be found with laundry detergent at your local grocer. Still, if you face difficulties finding it, you can make some yourself by mixing 1 tbsp. of Borax powder with one cup of water.
- Keep on stirring the aqueous solution of borax while pouring it into the glue-water mixture. You will watch the formation of a slippery blubbery goop as you do so.
- You know that your DIY process is complete when a ball of goo separates out from the mixture and takes its place in the middle of the container. If you find it hard to make the perfect combination, add some more Borax to make it click.
Oobleck With Baking Soda
- Take half cup water in a bowl.
- Add 4 tbsp. of baking powder to the water. Usually, this chemical is easily available. Nevertheless, if you can’t get it, make it yourself by mixing one part of baking soda with two parts of cream of tartar.
- Stir for a maximum of 45 seconds.
- After you finish off with stirring, add four more tablespoons of baking soda.
- Continue stirring for 1-2 minutes until the texture is thick enough.
Oobleck can also be made by adding baby powder to water.
Video on Making Oobleck
Storing the Oobleck
The goo lasts long when stored in an airtight container or a zip-seal bag. Take it out whenever you desire to play with it and put it back again in its place.
Cleaning Up the Oobleck
Use warm water to clean the material off your hands, clothes, and counter. If you think you are done with the goop, trash it but do not pour it down the sink as it may clog your drain.
Recipe For Making The Oobleck Dance
To make your oobleck rock, lay a subwoofer on its back with its cone facing upwards. If the cone is too small to accommodate the oobleck, pour it on an aluminum tray and place it over the cone. Otherwise, wrap the entire speaker in plastic so that the cone behaves like a bowl to hold the goo. Start playing some tune with lots of beats and bass and watch the solution vibrate.

How To Make The Oobleck Glow
To prepare glowing oobleck, add some tonic water containing quinine to the mixture and follow the same process mentioned above. Your Halloween celebrations will be more exciting with this.

Kids can try out making some innovative stuff with oobleck for their project. One idea is to make a fun oobleck pool with some toy animals dipped knee high in the fluid. It will give onlookers an impression of a havoc created by stepping on quicksand. Try dropping the seven colors of VIBGYOR on your fluid and have fun with your rainbow goo. If you are experimenting in the classroom, just be a bit more careful because the activity can be very messy.
References:
http://www.simplyrecipes.com/the_difference_between_baking_soda_and_baking_powder/
http://www.stevespanglerscience.com/lab/experiments/quicksand-goo
http://www.physicscentral.com/experiment/physicsathome/oobleck-fun.cfm
http://www.kidactivities.net/?tag=/oobleck
http://www.physicscentral.com/experiment/physicsathome/oobleck-fun.cfm
Leave a Reply